Home
SAP IDES ECC6 installation in the Cloud
SAP IDES Installation with Amazon Web Services -AWS
AWS AMI Setup and Configurations:
*AWS account be ready and estimate spending of USD30 ~ USD50 (Depends on the AMI Usage during setup)
Step 1: Create Virtual Private Cloud (To allow fix IP usage in AMI)
1) Login to AWS console and create a Virtual Private Clouds (https://console.aws.amazon.com/vpc )


2) Create a EBS volume used for FTP upload (~85GB) [all the SAP IDES installation files]


5. Click “Edit”
6. Change the root device (Drive C) from default 30GB to 100GB

7.Enter a name for the AMI

8.Use existing keypair / create new key pair for this AMI


SAP IDES ECC6 installation in the Cloud
SAP IDES Installation with Amazon Web Services -AWS
AWS AMI Setup and Configurations:
Step 1: Create Virtual Private Cloud (To allow fix IP usage in AMI)
1) Login to AWS console and create a Virtual Private Clouds (https://console.aws.amazon.com/vpc )
2) Enable DNS Hostname in VPC
3) Subnets created automatically (No change)
4) Network ACLs created automatically (No Change)
5) Internet Gateway created automatically (No Change)
6) Route Tables (No Change)
7) Create a new Security Group
- “Click Create Security Group”
- Enable all Traffic for Inbound and Outbound (Required security hardening later)

Step 2: Create an Windows FTP AMI for all the SAP IDES Installation Files
For cost saving recommend to create a micro Windows FTP server to upload all the SAP installation files into an EBS volume that will be used for the SAP IDES installation in different AMI
Create a Windows FTP AMI:
1) Create an micro Windows AMIT as FTP Server

3) Tag the newly created volume with relevant name
4) Attach the EBS volume to micro AMI
5) Completed EBS
Windows FTP configuration to upload all the SAP installation files: (Inside AMI)
1) Add IIS role by including FTP services in Windows and create a new FTP server in IIS manager.
2) Define the upload folder to the attached EBS volume (Ex: drive D)
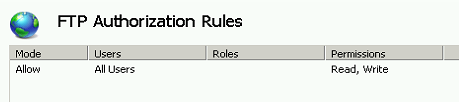
3) Enable Basic authentication
4) Allow all users access for read/write
5) Allow SSL connections
6) Restart FTP services
7)Connect with filezilla with the Elastic IP associate with the micro AMI (Using AWS public IP/DNS for connection)
- Unable to test with default command prompt ftp program (it will hang and getting error 501)
- Filezilla will be working fine
8) IIS manager showing connection successfully
Create the actual SAP IDES AMI (Windows 2008 R2 – Data Center):
Minimum hardware specification for SAP IDES ECC6:
No.
|
Items
|
Remark
|
1
|
Hard disk
|
Root directory (c:\): 100GB, Oracle and SAP
folders (d:\): 400GB, Installation files & folders (e:\): 85GB
|
2
|
CPU
|
2 Processor
|
3
|
Memory
|
8GB
|
4
|
Network
|
Recommended with fix IP
|
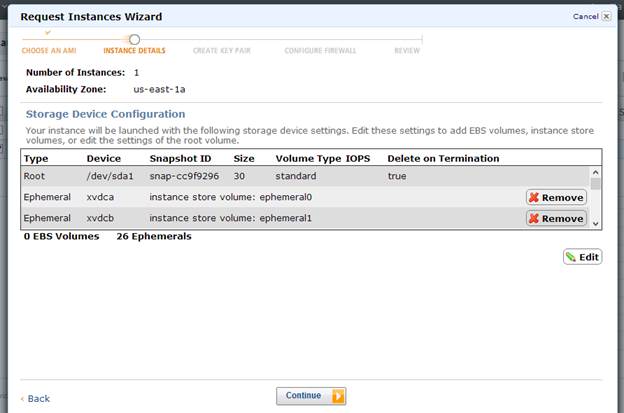
1) Create a m1.Large AMI (Windows 2008 R2 – Data Center)
- Click “Continue”
2. Select “Microsoft Windows Server 2008 R2 Base)
3. Choose “m1.large” and “EC2-VPC) and select the subnet created in VPC
4. Enter IP “10.0.0.11”
5. Click “Edit”
6. Change the root device (Drive C) from default 30GB to 100GB
7.Enter a name for the AMI
8.Use existing keypair / create new key pair for this AMI
9.Choose the created security group that allow all inbound/outbound traffic
10.Confirm all the selection and click “Launch”
11.AMI created successfully
2) Created EBS volume for (Drive D) around 400GB for SAP Installation Drive (Ex: Oracle and SAP folders)
3) Attach both the EBS volume accordingly (Drive D and Drive E as step below)
4) Associate SAP Installation EBS and SAP Installation Files EBS to AMI (In sequence to ensure Drive D=SAP Installation EBS, Drive E=SAP Installation Files EBS)
5) RDP with the Elastic IP that associate this AMI (with default login: Administrator Password: Generated from AWS encrypt file)
- RDP will only work after perform step 3: Associate Elastic IP


Step 3: Create an Elastic IP (Public IP to access the AMI through VPC)
1) Create an Elastic IP and associate it to the AMI
- Associate with the option “Network Interface”

SAP IDES Installation:
Step 1: Windows Server 2008 R2 Pre-requisite:
1) Change computer name to < 13 characters

2) Change swap space to at least 25GB

3) Change default Windows “Administrator” password
4) Configure fix IP same as ipconfig (DHCP IP address) and DNS with “8.8.8.8” (Google DNS) to allow internet access

Step 2: Oracle Installation:
1) Copy ORACLE RDMS content to root drive (c:\oracle)

2) Run “sapserver.cmd”

3) Enter relevant details:

4) Proceed installation with default options

5) Wait until installation finish

Step 3: SAP ERP installation:
1) Run the correct version of “sapinst.exe” (Install master folder\Data_Units\BS2011_IM_Windows_x86_64

2) Wait for the splash screen to appear

3) Select ERP

4) This screen will only appear for running sapinst more than once. Depends on condition to choose the option required

5) Choose “Typical” Parameter Mode

6) Enter 3 Characters SAPSID

7) Uncheck the “Set FQDN” option since we’re not using at the moment

8) Type the password

9) Type the DBSID should same as the ID entered during Oracle setup

10) Select the relevant installation folder

11) Select the relevant installation folder

12) Select the relevant installation folder

13) Use the default settings

14) Ensure all the drive are correct (Drive D – EBS volume)

15) Ensure drive D selected for all installation folders

16) Ensure drive D selected for all installation folders

17) Select the relevant installation folder

18) Use the default settings

19) Click “Yes”

20) Select “NO” since it not integrating with others SAP system

21) Ensure all parameters are correct

22) Installation begin

23) Files created (Ex: d:\oracle\ECC\sapdat1\sr3_10)

24) Roughly 15 hours to reach the “Perform ORA Post load activities” phase

25) Roughly 19 hours to reach the “create database statistics” phase

26) Finally the installation complete, a message pop-up showing the installation is successful and the SAP system is up and running. (The installation take almost 24 hours to complete)

Step 4: Accessing the system with SAP GUI
1) Select the “SetupSAPGUI”

2) Wait for the splash screen

3) Click “Next”

4) Select the SAP GUI Suite

5) Wait for the installation process to complete

6) Installation complete

7) Create the entry for SAP IDES

8) Enter Description: SAP IDES ECC6, Application Server: 10.0.0.11, Instance Number:00, System ID:ECC

9) Login with user: SAP* for the first time

10) The system status

Step 11: Activities after installation
1) Login with DDIC in client 000 and execute “se06”

2) Click “Yes”

3) Execution complete

4) Execute “sgen” (few hours to process)

5) Don’t forget to create an SAP_ALL “admin” ID with “SU01”
- Trace the relevant log files for further information

- Locate the error. In this example are the installation file corrupted

Solution:
- Re-download the relevant files and replace it.
- Wait until the “Import ABAP” process prompt for error and click “retry” to re-process the pending files
2) Rebooting the server after SAP installation
- Right click on the instance and select “stop”

- Select either one

- Enter the login credentials and wait for the SAP system to stop and reboot/shutdown the server as usual

- RDP will only work after perform step 3: Associate Elastic IP
6) Confirm all drives are mounted correctly.
Step 3: Create an Elastic IP (Public IP to access the AMI through VPC)
1) Create an Elastic IP and associate it to the AMI
- Associate with the option “Network Interface”
SAP IDES Installation:
Step 1: Windows Server 2008 R2 Pre-requisite:
1) Change computer name to < 13 characters
2) Change swap space to at least 25GB
3) Change default Windows “Administrator” password
4) Configure fix IP same as ipconfig (DHCP IP address) and DNS with “8.8.8.8” (Google DNS) to allow internet access
Step 2: Oracle Installation:
1) Copy ORACLE RDMS content to root drive (c:\oracle)
2) Run “sapserver.cmd”
3) Enter relevant details:
4) Proceed installation with default options
5) Wait until installation finish
Step 3: SAP ERP installation:
1) Run the correct version of “sapinst.exe” (Install master folder\Data_Units\BS2011_IM_Windows_x86_64
2) Wait for the splash screen to appear
3) Select ERP
4) This screen will only appear for running sapinst more than once. Depends on condition to choose the option required
5) Choose “Typical” Parameter Mode
6) Enter 3 Characters SAPSID
7) Uncheck the “Set FQDN” option since we’re not using at the moment
8) Type the password
9) Type the DBSID should same as the ID entered during Oracle setup
10) Select the relevant installation folder
11) Select the relevant installation folder
12) Select the relevant installation folder
13) Use the default settings
14) Ensure all the drive are correct (Drive D – EBS volume)
15) Ensure drive D selected for all installation folders
16) Ensure drive D selected for all installation folders
17) Select the relevant installation folder
18) Use the default settings
19) Click “Yes”
20) Select “NO” since it not integrating with others SAP system
21) Ensure all parameters are correct
22) Installation begin
23) Files created (Ex: d:\oracle\ECC\sapdat1\sr3_10)
24) Roughly 15 hours to reach the “Perform ORA Post load activities” phase
25) Roughly 19 hours to reach the “create database statistics” phase
26) Finally the installation complete, a message pop-up showing the installation is successful and the SAP system is up and running. (The installation take almost 24 hours to complete)
Step 4: Accessing the system with SAP GUI
1) Select the “SetupSAPGUI”
2) Wait for the splash screen
3) Click “Next”
4) Select the SAP GUI Suite
5) Wait for the installation process to complete
6) Installation complete
7) Create the entry for SAP IDES
8) Enter Description: SAP IDES ECC6, Application Server: 10.0.0.11, Instance Number:00, System ID:ECC
9) Login with user: SAP* for the first time
10) The system status
Step 11: Activities after installation
1) Login with DDIC in client 000 and execute “se06”
2) Click “Yes”

3) Execution complete
4) Execute “sgen” (few hours to process)
5) Don’t forget to create an SAP_ALL “admin” ID with “SU01”
Error during “Import ABAP” Process
- Check the “Import_monitor.log” in “c:\program files\sap_inst\ERPEHP6\AS-ABAP\ORA\Central”- Trace the relevant log files for further information
- Locate the error. In this example are the installation file corrupted
Solution:
- Re-download the relevant files and replace it.
- Wait until the “Import ABAP” process prompt for error and click “retry” to re-process the pending files
2) Rebooting the server after SAP installation
- Right click on the instance and select “stop”
- Select either one
- Enter the login credentials and wait for the SAP system to stop and reboot/shutdown the server as usual
Nice and good article. It is very useful for me to learn and understand easily. Thanks for sharing your valuable information and time. Please keep updating
ReplyDeleteAWS Online Training
Good information. Thanks for sharing with us.This is good information and really helpful for the people who need information about this.Really the post is very unique.every concepts are captured nice.
ReplyDeleteoracle training in chennai
oracle training institute in chennai
oracle training in bangalore
oracle training in hyderabad
oracle training
oracle online training
hadoop training in chennai
hadoop training in bangalore
Say, you got a nice article post.Really thank you! Really Great.
ReplyDeletedata science training
python training
angular js training
very use full document for cloud based installation for SAP system
ReplyDelete